
 LinkBack URL
 About LinkBacks
 Go-Kart
This will be a fairly detailed and visually step by step (to the best of my ability) on how to hook up, mount, and enjoy your new cold air or short ram intake. I used the products that were available to me at my local auto parts chain, which are parts that should be widely available nation wide. They carried Spectre brand which I have found to be quite a bang for buck. Let us start with what we need-
10mm socket
7mm socket
Flathead/phillips screwdrivers
Extensions! At least 6-8"
3" silicone coupler
Spectre T bolt Clamp 3" part #8703
Spectre intake tube 3" by 6" part #8708
3" intake Cone Filter
You may need additional hose clamps as well
This will include 2 styles of intake, the short ram (less expensive) and a cold air intake or velocity stack set up.
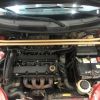
Straight into the project, rip out the old air box. Throw out that useless filter inside and put the air box in the for sale section of this forum (anyone want to buy mine? Cheap!). Loosen the air hose clamp and detatch the hose from the air box outlet. Take out the three 10mm bolts keeping the box from freedom. The bottom bolt is tough if you don't have long enough extensions for your ratchet. Once the air box is out, we move to the front passenger wheel well, directly under where we just were.
We have to peel back the wheel well liner in order to access and remove the rest of the stock intake system, the baffle (useless hunk of plastic). You must do this for the cold air to flow into your new intake, or else your new system will be sucking in hot engine air, yuck. That is not an upgrade.
Start by turning the wheel all the way to the right. Using a 7mm socket, take out the bolts that hold the plastic sheild lining the passenger wheel well. There are several along the fender, a couple under the front bumper and near to strut. I did not completely remove the plastic liner, I took it back about half way and tucked it in place towards the wheel. Once you can access the wheel well, you will see the rest of the intake baffle portion to be removed. Eith a 10mm socket, undo the 3 bolts that keep this junk-box on. Fishing it out from under your car is a chore too. It is worth it.
Now that the tear down is complete, we can start to build. For a build where you want to keep your stock air hose or want a less expensive build, continue reading the short ram build. I rocked this for a few weeks and it is a huge improvement over the OEM. For a cold air or hybrid short ram / velocity stack set up, skip down a little or just read the whole thing because you like to read car modding posts (I know I do).
For a short ram build with a stock air hose, the assembly is straight forward. Begin by fitting your filter onto your 3" tubing. Once fitted, use the silicone connector to fit the piping to the air hose. That is it, it is that simple. The cone filter will nestle right behind your headlight in the corner. I used a small length of rubber fuel line split down the middle to protect the edge of the sheet metal between the headlight and filter, just in case. Don't over tighten anything but make sure you snug up the hose clamps. I didn't have any air or vaccuum leaks connecting the silicone coupler right to the end of the air hose as long as you don't tighten the clamp to the point where the air hose folds or crimps. Continue reading for the bracket installation.
For a cold air or velocity stack set up that is a little cheaper than a full blown kit (and fits pretty good), this how to is for you. I unhooked the return hose and MAF sensor and cut the air hose (you did whaaat?). I trimmed it right to where the ribbing starts near the sensor ports (reference the picture if you aren't sure where to cut). Realize that there is no going back at this point and you have to make it work ( I had that slight panic but I made the sacrifice for you all ).Then, the toughest part but it is certainly possible, is fitting that section back over the throttle body inlet. It took me a while, but it looks so clean and I did not have to buy bent tubing or a vaccuum / sensor port tube. Also, you won't be able to use the stock hose clamp again, you'll need to size up. I also trimmed the return hose because the port was relocated and the hose was now too long. Once the tedious task of putting the trimmed hose back on is done, you can put the filter on the tubing and connect the filter assembly with the air hose with the silicone coupler. Things get pretty cramped so do everything in the order that you want, but I would certainly mount the air hose first.
Now that you have your intake on, which ever set up you have, it is time to secure the whole thing. This may be the most frustrating part but it is so cost effective and worth it. Working with the aforementioned T clamp, take the lock nut off and let it spring open. This clamp will actually thread right into the OEM air box bolt hole (so sweet, I did a dance when I figured that out). You'll notice that if you don't thread it enough, the clamp won't close with enough threading for the lock nut. Thread too far in and the clamp will be too tight around the piping or air hose. I had to adjust and readjust this for something like 20 min before I just barely got it to fit. Believe me, you can do it, it is possible. Once the clamp is on and the lock nut is secure, you will notice that the intake is not touching the strut mount or engine mount. Whew. If you chose to trim your air hose and have a filter that allows for a velocity stack, you should have just enough room to make a 90 degree bend through the hole in the wheel well. If you are doing a cold air intake, hopefully you find the trimmed hose and bracket trick to be most helpful.
Thank you everyone for reading my tutorial, I hope this helps and gives you confidence to do such an upgrade. I notice a lot more power in my low end and going up hills. Worth the $50-60 and hour and a half or so. Enjoy your intake!!


 Reply With Quote
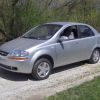 Rescued Aveo

 Blue Car
 Bumble Bee