
 LinkBack URL
 About LinkBacks
Thanks for the encouragement.
Again, once you're past the point where the transmission bellhousing is mated to the engine, it's pretty much all downhill.
I made sure all the bolts would start threading before going any farther. Once they were all seated, I installed the two mounting brackets, to make sure the drivetrain was held securely in place. I installed the driver side mount first. The drivetrain has probably moved around a little bit, so getting the mounting bracket back on could be tricky. I got one bolt in place between the mount and the transmission, then I maneuvered the drivetrain with the hoist and a broom handle until I was able to ALMOST get a bolt through the mount and into the body of the car. At that point I just grabbed my big Philips head screwdriver and stuck it in through another hole in the mount and sort of pried the mount into position so I could get one bolt started. Once one is in, get a few threads in for the other mounting bolts and then start tightening them slowly. I ended up moving the hoist a little more so that everything came together better. The mount-to-transmission bolts are 44 ft-lbs. I couldn't find a spec for the bolts connecting it to the body, but the engine side is very similar and so I used that spec. Those bolts were 48 ft-lbs and the nuts were 30 ft-lbs. I honesly can't remember whether they were bolts or nuts. There might have been some of each.
Anyway, then I put the rear mount back on. The mount-to-body bolts are 41 ft-lbs, and the bracket-to-transmission bolts are 59 ft-lbs. Likewise, the connecting bolt and nut between them is 59 ft-lbs. After that, I tightened all the transmission-to-engine bolts.The transmission-to-engine bolt torques are as follows.
1, 6-10: 54 ft-lbs
2: 15 ft-lbs
3-5: 23 ft-lbs
Next came the clutch slave cylinder. This was a little awkward, because it had extended as far as it could go, so I had to push it back into place. If you have to do this, do it slowly so you don't spray fluid out your reservoir. Luckily, it's easy enough to just do this by hand. The bolts to hold this in place are 15 ft-lbs.


 Reply With Quote
 "Pre-Aveo"
 Chevrolet's Aveo RS Concept

 ChevyCC
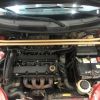 Go-Kart